Most Working Holiday permit applicants complete the process from their country of residence, but it’s perfectly legal to apply from Canada if you’re already there. Read on to discover what’s different when you’re applying for a Working Holiday permit to Canada… from Canada.
Note that the following information also applies to the other two IEC categories, namely Young Professionals and International Co-op (Internship).
The two main differences are the way biometrics collection is handled and how you activate your permit after it’s granted.
Paying the biometrics fee separately AFTER receiving the Invitation to apply
IEC applicants who are already in Canada can submit their fingerprints and photo to a designated Service Canada office allowed to collect biometrics for immigration purposes. Normally, the biometrics fee is paid during the application process, but in some cases, applicants who are already in Canada will not be asked to pay the biometrics fee at the end of their application—it must be paid separately.
The biometrics fee of $85 may not be listed along with the permit fees if you’ve selected “Canada” as your country of residence. In this case, you may not get the biometrics instruction letter applicants usually receive within 24 hours.
But you still have to pay the biometrics fee.
Submit your application and check your account again a few days later. You will receive a message saying you have to pay the biometrics fee and submit a proof of payment. In this case, you will be invited to pay the fee online on this page.
Go to “Option 2–Choose your fees from a list” at the bottom of the page and select “Temporary residence” in the drop-down menu. Click on “Continue.”
On the next page, enter “1” in front of “Biometrics–per person.” Click on “Submit.”
Follow the instructions to pay online, then print out the receipt and submit it as a proof of payment from your account.
You will receive the biometrics instructions a few days after submitting the proof of payment. Note that it will take longer than the typical 24 or 48 hours because the Government of Canada has to link the proof of payment to your application.
A forum member suggested submitting proof of payment for the biometrics fee along with the full application. We’re not sure whether it speeds up the process or not, but it’s worth a try. If you still get a message asking for proof of the biometrics fee payment, don’t worry, it’s probably that the person checking your application missed it the first time.
What should I do if I don’t get a message asking me to pay the biometrics fee?
Don’t worry, it happens. In this case, just pay the fee separately—we’ll show you how:
- Just go to the page “Pay your application fees online.”
- Find the line “Biometrics–per person” and enter “1.” The fee should be $85. Click on “Submit.”
Once you’ve paid the fee, use the IRCC webform to send the proof of payment along with a short explanation (basically, you didn’t get the message asking you to pay the fee).
Where should I go to give my biometrics in Canada?
You will have to go to a designated Service Canada office—“designated” is the key word here because not all Service Canada locations collect biometrics.
Go to Where to give your fingerprints and photo (biometrics) to find the closest location.
Important:
- Remember that it’s important to go step by step when you’re applying for your IEC permit! After submitting your profile to a pool, you may get an Invitation to apply during a round of invitations. This is the beginning of the process. Then you will have to submit your full application. Only then you will receive the biometrics instruction letter (or not, see above… regardless, biometrics is one of the final steps!). Read Introduction to the Canada Working Holiday permit for a refresher, it will make a lot more sense!
- You have to make an appointment to give your biometrics in a designated Service Canada centre.
- You will see either “SCO” or “POE” next to the biometrics collection sites listed here. You have to use an “SCO” (Service Canada Office) location or VAC (Visa Application Centres). “POE” (Port of Entry) sites, i.e. airports and land border offices, don’t accept biometrics collection for IEC applicants. Read the “Notes” section carefully as well, as some sites only collect biometrics for specific immigration categories—you will see the note “Most applicants are not eligible to give biometrics at a POE.”
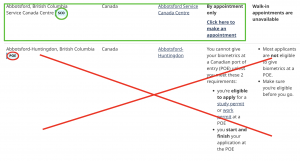
You will find designated Service Canada offices where you can give your biometrics in the following locations.
Provinces and Territories |
Cities |
---|---|
Ontario |
Toronto (3 locations) / Ottawa (2 locations) / Scarborough / Brampton / Sudbury / Hamilton / Kitchener / London / Mississauga / North York / St. Catharines / Thunder Bay / Whitby / Windsor |
Québec |
Montréal (2 locations) / Gatineau / Laval / Brossard / Saint-Laurent / Sainte-Foy (close to Quebec City) / Sherbrooke |
Colombie-Britannique |
Vancouver / Victoria / Richmond / Prince George / Surrey / Burnaby / Chilliwack / Kelowna / New Westminster |
Manitoba |
Winnipeg (2 locations) |
Ile-du-Prince-Édouard |
Charlottetown |
Alberta |
Calgary (4 locations) / Edmonton (3 locations) / Red Deer / Fort McMurray / Lethbridge / Medicine Hat |
Nouveau Brunswick |
Fredericton |
Nouvelle-Écosse |
Halifax / Dartmouth |
Saskatchewan |
Saskatoon / Regina |
Yukon |
Whitehorse |
Territoire du Nord-Ouest |
Yellowknife |
Terre-Neuve-et-Labrador |
St. John’s |
Nunavut |
Iqaluit |
Check out Where to give your fingerprints and photo (biometrics) for the full list of designated Service Canada sites.
- You should see “SCO” next to the name of the site.
- There should be no restrictions to specific immigration categories (i.e. “Most applicants are not eligible to give biometrics at a POE.”).
- You should see “By appointment only” (… so do make an appointment!).
Plan a quick trip to exit Canada and re-enter to activate your permit
At the end of your successful IEC permit application, you will receive your Port of Entry (POE) Letter. This is the document you have to show upon arrival to have your permit issued.
The thing is… you’re already in Canada.
So, you will have to leave the country and re-enter—even if it’s ten minutes later!—to “activate” your IEC permit.
There are two options:
- Taking a legit trip outside the country, i.e. taking the opportunity to fly to the US, Mexico, or even back home, and flying back to Canada. In this case, your IEC permit will be activated when you see a border services officer at the airport when entering Canada.
- Taking a quick trip across the land border. US border officers are used to it and they don’t mind—just make sure you’re meeting all the requirements to enter the US. You can re-enter Canada a few minutes later and activate your IEC permit.
“Flagpoling ,” i.e. going to the US and coming back to Canada just to officially “land” in Canada and get a permit activated, has been a thing for decades!
0 comments
{{like.username}}
Loading...
Load more