Complete your application — Upload supporting documents, submit and pay
Every applicant will have supporting documents to upload. This chapter will cover each supporting document you need to provide. Use the buttons below to navigate to a specific supporting document:
What documents do I need?
The documents that every applicant must provide are:
- Form IMM5707 (“Family information” form)
- A curriculum vitae (CV/resume)
- A digital copy of your passport identification pages, as well as copies of any pages with stamps and visas, combined into a single PDF document
- A digital photo of yourself
Depending on the answers you gave throughout your application and your country of citizenship, you may have additional documents to provide. These include:
- Police certificates: Unless you are a citizen of France, Belgium, Spain, Switzerland or Japan, you must provide a police certificate from your country of citizenship. You must also provide a police certificate from any foreign countries where you have lived for more than six months since the age of 18.
- Medical exam: If you plan to work in the health services or with children, or you have recently spent six months or more in a country deemed at risk of tuberculosis, you will need to upload proof of a medical exam.
- International Co-op category candidates only: Proof of registration at a post-secondary educational institution and proof of your internship agreement.
- Young Professionals category candidates only: Post-secondary diploma, certificate or degree if you have a NOC TEER 4 job offer.
Uploading a document
To upload a document, click on “Upload File”:
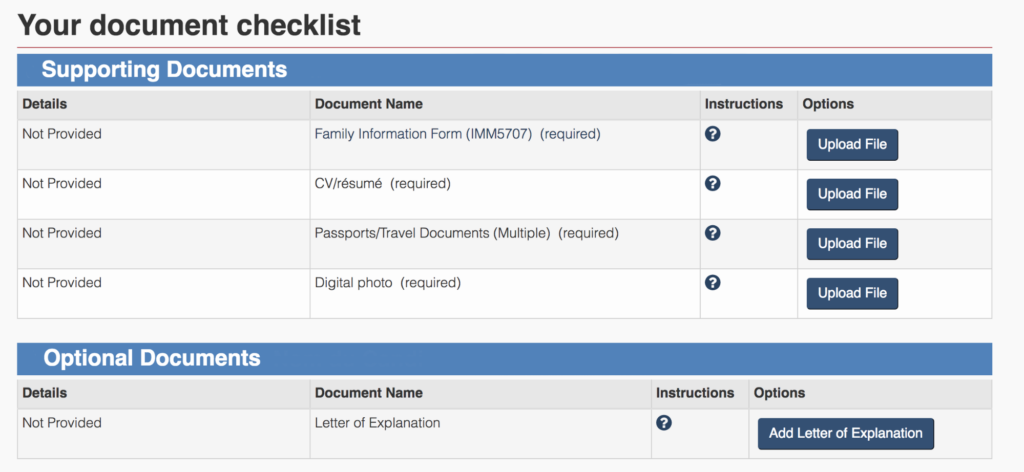
Select the document you want to upload and click again on “Upload File”:

You can only upload one file for each requested document. We recommend using PDFs—just make sure they aren’t locked or password-protected!
If you see “Multiple” next to a requested document, this means you have to provide several documents:
In the above example, this would be scans of the identification pages of your passport, plus any pages with stamps/visas.
All documents must be combined into a single file (PDF recommended). You have several options for how to do this:
- You can scan the different pages, then copy and paste them into a Word document that you will save as a PDF. Make sure the image resolution is acceptable.
- You can use PDFCreator.
- You can use free online PDF mergers, like Sejda.
Once you have uploaded your chosen file, you’ll see a message confirming the document selected was successfully uploaded:

Note that document names can’t include accent characters (like “é” or “ö”)—if they do, you’ll get an error message. If you are still getting error messages after fixing the file name, try another browser.
1. Form IMM5707 (Family Information form)
Download the Family Information form (IMM5707) from the list of required documents.
Note: Depending on your citizenship, you may be asked to fill out Form IMM5645 instead. Despite slight differences on the forms, the purpose is the same—to supply IRCC with details of your family (parents, spouses, children, etc.).
To open the Family Information form, you must save the PDF file on your computer and open it outside of your internet browser, otherwise you will come across this error message:
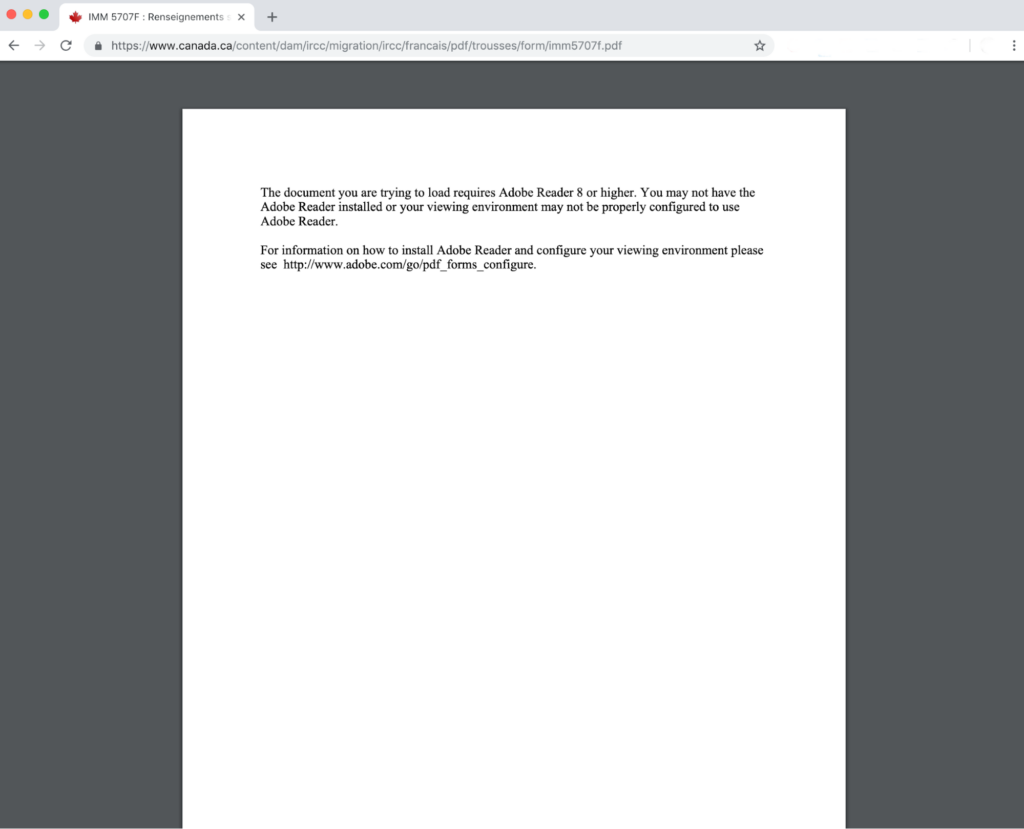
For more information, read How to open Immigration, Refugees and Citizenship Canada PDF forms.
Section A
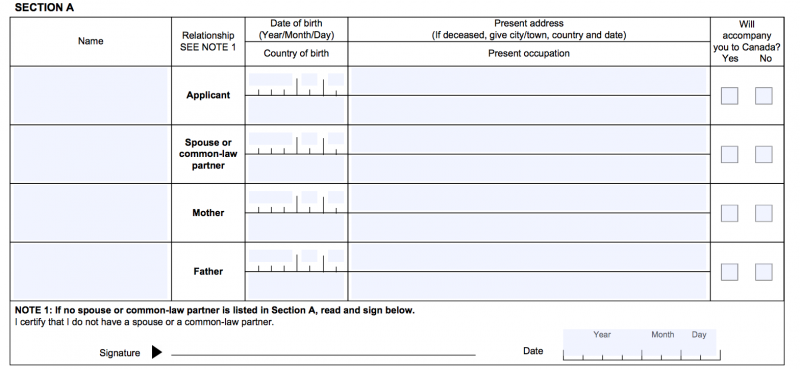
The first row refers to you, the applicant. Enter your personal details, then answer “Yes” for “Will accompany you to Canada?”
Then, you need to state if any family members will be coming with you to Canada. Tick “Yes” or “No” to answer the question “Will accompany you to Canada?” on each row.
Your answers won’t affect your application. However, keep in mind that any family members travelling with you to Canada will need their own immigration status. For more information, read IEC permit to Canada: Travelling as a couple and/or with kids.
If applicable, enter personal details for your spouse or common-law partner. If you’re not sure what defines a common-law partner, read How Does Canada Define a “Common-Law Partnership,” Exactly?
Next, enter the details for your parents. If you don’t know the details (e.g. you grew up in foster care, you are estranged, etc.), it is fine to write “Unknown”. If one or both parents are deceased, you can write “Deceased”.
Section B
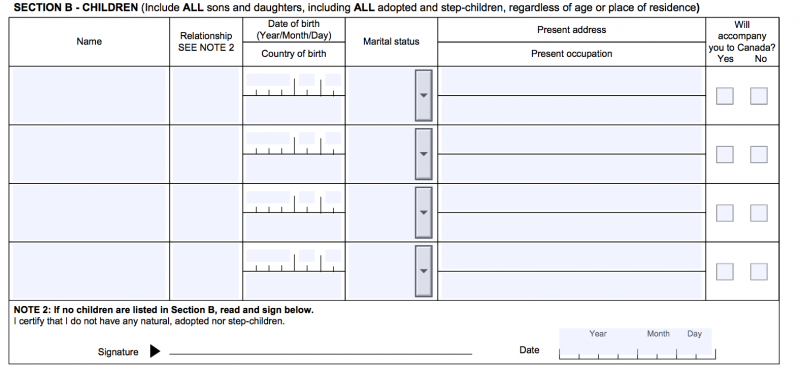
Fill out a separate row for each child you have. If your children are in school, enter “Student” for “Current occupation.” If they are too young to go to school, you can write “N/A”.
Section C

The requests for signature can be confusing, but you do not actually need to sign the Family Information form. This is because when you come to submit your IEC application, you will be asked to type in your name and answer a security question. This is your electronic signature, which applies to all forms attached to the application.
Questions specific to Form IMM5645
If you are asked to fill out Form IMM5645, tick the “Worker” box for “type of application”—you are applying for an IEC work permit.
There is also an additional section on Form IMM5645 for brothers and sisters. If applicable, enter the personal details of your siblings in the space provided.
2. CV/resume
It’s important to note the CV you provide to IRCC is not intended to help you find work. The purpose of this CV is more to show IRCC what you have been doing from the age of 18, including any periods of study, unemployment, volunteering, travel, and paid work.
Here is the official wording from IRCC:

Make sure you include:
- Months and years for start and end dates.
- The city and country for each work/education experience.
- An explanation for any gaps in your work history, e.g. “maternity leave,” “sick leave,” “travel,” etc.
- The location(s) and the dates of a trip if you have periods of travel.
- A brief description (no more than 2-3 bullet points) of each job role.
Use the CV as a way of explaining anything listed in your work and education history on the application form that may be unclear. For example, if you listed an internship in your work history section, now is the chance to clarify that it was an intern position.
There should not be any gaps in your CV. IRCC does not care why you have gaps of unemployment. Whether you were looking for a job, taking time off to figure life out, recovering from health issues, raising a child, etc., all they care about is that you give a reason. You don’t want to receive the request for the
IMM5257 — Schedule 1 form, so make sure you provide a comprehensive CV!
3. Passports/Travel documents (ID, visas, stamps pages)
You will need to provide a scan of your passport, as per IRCC’s instructions:
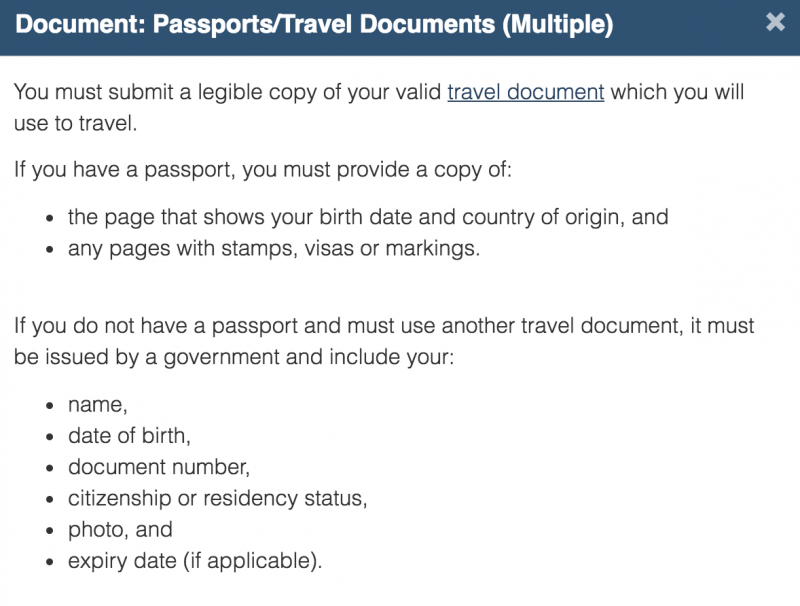
Upload:
- A scan of your passport pages with personal information (usually pages 2 and 3).
- A scan of all pages with a stamp, a visa, or notes from a border services officer.
Your personal information pages and any pages with a stamp or visa should be combined into a single document, preferably a PDF file.
4. Photo ID
You must upload a recent ID photo that meets the Temporary Resident Visa application photograph specifications:
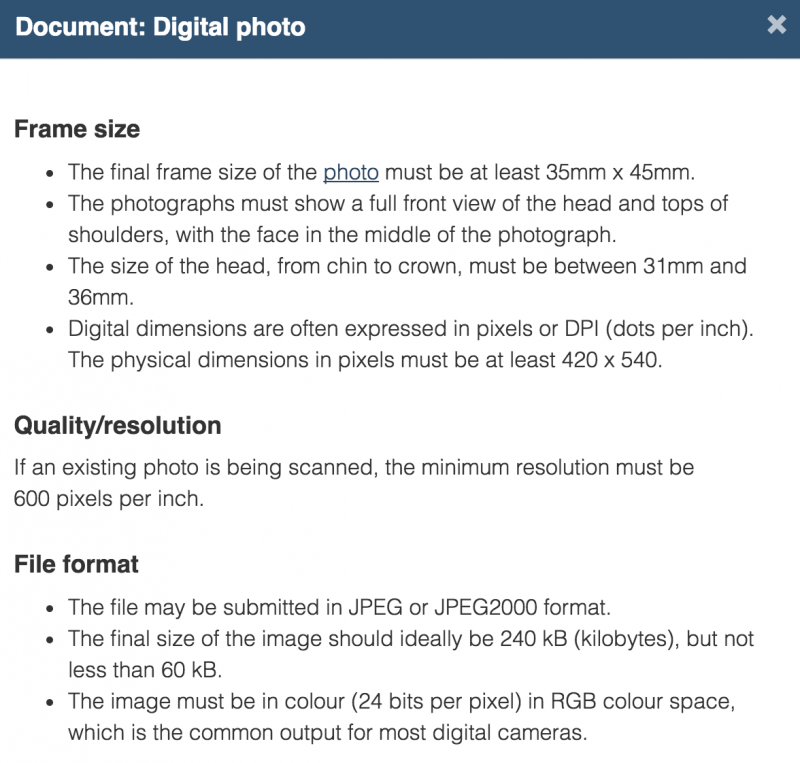
As long as requirements are met to the best of your ability, it doesn’t matter whether the photo is taken by a professional photographer, with your phone at home, or in a photo booth.
5. Police certificates (if applicable)
Who needs to supply police certificates
You need to provide a police certificate if any of these situations apply to you:
- Unless you are a citizen of Belgium, France, Switzerland, Spain, or Japan, you will need a police certificate from your country of citizenship.
- You need a police certificate for any country that you spent more than six months in from the age of 18.
- You need a police certificate if you answered “Yes” to a question about a criminal offence or arrest (even if your citizenship would usually be exempt from providing police certificates). In this case, you must also be prepared to share supporting documents to further explain your convictions, such as evidence of fines, sentences served, etc.
Here are some important dates to be aware of:
- The police certificate for the country where you are currently living must be from within the last six months.
- Police certificates from countries where you spent more than six months in the past can be applied for at any time after you leave the country. They remain valid with no expiry date, unless you return to the country. If you return to the country (even for a day!), your police certificate becomes invalid and you will need to apply for a new one.
Note: A common mistake people make when applying for multiple IEC participations is thinking they don’t need to renew their home country police certificate. We often hear, “I haven’t been home in years because I’ve been living in Canada!” However, if you were living in your home country at the time the original certificate was issued, you will be expected to supply a new police certificate. Since most people apply before making the move abroad, a new police certificate is almost always expected.
How to apply for police certificates
Go to How to get a police certificate and look up the exact process for the countries you need a police certificate from.
You must make sure you apply for the correct document(s), as specified on the Government of Canada’s website. For example, for UK citizens, Canada will only accept ACRO police certificates; basic DBS checks are not sufficient. For Australia, if you lived in Queensland or Victoria, you must apply for your traffic history, as well as a police check.
Every country has its own requirements. Some police certificates are free to apply for, whereas others have fees. Some countries offer an online application process, whereas others require an in-person visit to an embassy.
Uploading police certificates
All police certificates must be in a single document, so make sure to merge all your documents into one PDF file (not password-protected) for upload.
If the police certificate isn’t supplied in French or English, you must upload the original certificate AND a translation, completed by a certified translator. Merge the certificate and the translation into one document.
If you have applied for a police certificate and it has not arrived within the 20-day deadline for completing your application, it is fine to upload the proof that you have applied. This could be a screenshot of an email request, a confirmation email, a receipt for payment, etc. IRCC will open a slot for you to upload the actual police certificate once you receive it.
6. Proof of a medical exam (if applicable)
Who needs a medical exam
You only need to take a medical exam if:
- You stated you want to work with children, in healthcare, or as a caregiver in Canada.
- You recently lived in one or more countries that Canada designated as having risk factors for tuberculosis. In the list of countries, look for “YES” in the “Immigration Medical Exam (IME) required” column to see if a medical exam is required.
- You have a physical or mental condition that will require ongoing treatment in Canada.
- You or someone in your family has or had TB.
If applicable, you need to book a medical exam with a doctor that has been approved by IRCC, called a panel physician. This type of medical examination can be expensive. Because of the cost, it’s best to wait until you receive an Invitation to Apply (ITA) before seeing a panel physician.
What to expect if you need a medical exam
On the day of the medical exam, make sure to bring:
- A valid piece of photo ID (passport, driver’s licence, etc.)
- Your glasses or contacts (if applicable)
- Your national health card (if applicable)
- Any medical reports or test results related to current or past health conditions (if applicable)
- Any additional documents the doctor requests
The medical exam is much like a routine physical. The doctor will do a quick eye exam, check your height and weight, and do a reflex test. You will have to answer a number of questions about your medical history and lifestyle.
You will usually have a chest X-ray and blood work taken. Depending on your medical history, other tests or exams could be performed. Plan your time accordingly, as your appointment may take a while if you are required to take lots of tests.
Contact reception for more specific details about what to expect from your appointment.
Uploading proof of medical exam
The panel physician will give you a form as proof of your medical exam at the end of your appointment. Note that you will not be given any test results; the doctor shares these directly with IRCC. You will need to ask during your appointment for a copy if you want to know the test results.
You must upload the IMM1017B-Upfront form the doctor gives you—this is your supporting document.
Since you only have 20 days to complete your IEC application, it is not always possible to get an appointment within 20 days. It is fine to upload proof that you have booked an appointment if you haven’t had the medical exam in time. IRCC will open up a slot for you to upload the proof of your medical exam at a later date.
On rare occasions, IRCC may request you return to the panel physician for a further medical exam. If this happens to you, you will receive instructions from IRCC to give the doctor, explaining the further tests IRCC want to be carried out. If this happens, your application is put on pause; you do not lose your slot while you undergo further testing.
Arriving in Canada
When you arrive in Canada and activate your work permit, make sure that the permit doesn’t have the following condition written on it: “Not authorised to work in 1) child care 2) primary or secondary school teaching 3) health services field occupations.” If you have completed the medical exam, this condition should be removed. Let the border services officer know immediately if you notice a mistake.
Note that medical exam results are only valid for 12 months. If your medical exam expires before you travel to Canada, you will need to book another exam.
Submitting the documents, signing the application form, and paying the fees
Once uploaded, each supporting document name should show in green. You should see a “Next” button. Once you have clicked “Next”, you will have to electronically sign your online application.
Read the privacy policy, accept the terms and conditions, and declare that the information you have given in your application is true.
Enter your last and first names at the bottom of the page and answer one of your security questions. Click “Sign.”
You’ll see the same page again. This time, the page will have your names at the bottom, which is your digital signature. You can see your names above the “Transmit and pay” button.
Click “Transmit and pay” and pay the IEC fees using your preferred payment card. For more information about IEC fees, read How much does it cost to participate in International Experience Canada?
Click the green “Process Transaction” button to finish. If payment goes through correctly, you’ll be redirected to your IRCC account.
You should see a message confirming your application was submitted. You can now click “Exit Questionnaire.” Well done, you’ve just submitted your IEC application!
Soon after, you’ll receive a new message in your account confirming receipt of your application. Note that IEC work permit applicants can ignore the request to send in their passport (this is a standard message sent for all permit applications, and not relevant to IEC).


 Français
 English


(4)Comments
At the end of every season the pools are emptied and you have to make a new inscription the next season. Yes, in general season stops around october/november and the new season starts end of december, beginning of january.
To ask a whv in Canada Italian have de be resident in Italie. IRCC says : "prove that you are a resident of Italy at the time of submitting your application;"
So for you its better to mention Italie as country of residence and not the Netherlands. If you mention the Netherlands you won't be able to enter the pool.
{{like.username}}
Loading...
Load more